Crochet Sloth Keychain - FREE pattern
- Remadi Wolshlager
- Mar 4, 2022
- 4 min read
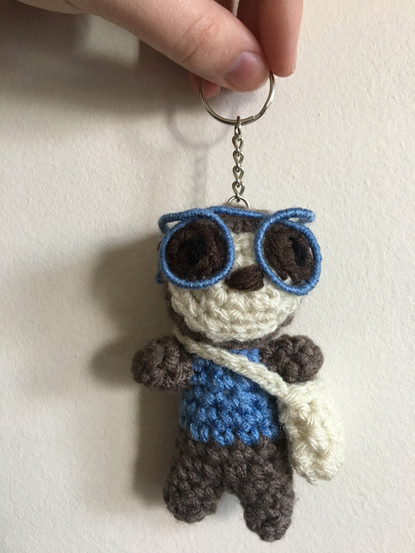
For some reason I think sloths are so cute! I was trying to find a cute sloth keychain pattern the other day, but I couldn't find one that was quite what I wanted - so I decided to create my own! Today I'll be sharing the basic sloth pattern, as well as the little accessories I created to turn it into a "student sloth". I'm planning on creating a series of little professional sloth keychains, but all will be created using this base pattern. Feel free to experiment with this base and tag me on Instagram @the_cozyx with what you come up with! I'll be selling the finished sloths on my Etsy, and once I've created a series of sloths, I'll write all the patterns for them as a downloadable pdf on my Etsy as well, so if you'd like a printable version of this pattern, I'm planning on having that up maybe by this April :) Anyways, have fun with this pattern and get creative!
Sloth Keychain
Designed by Remadi

© 2022 The Cozyx - All rights reserved. This pattern and its contents are only for personal use. Do not copy, edit, redistribute, or sell this pattern. You are welcome to sell finished products with your own photos in small quantities, but if you do so please give pattern credit to the Cozyx. Thank you and enjoy!
Abbreviations (US):
MR: Magic ring (adjustable loop)
Sc: Single crochet
Ch: Chain
Sl st: Slip stitch
Yo: Yarn over
Hdc: Half double crochet
Sc2tog: single crochet two together
Sts: Stitches
Blo: back loops only
*...*: Repeat stitches within asterisks ... times
Tools and Materials:
3.75 mm F/5 Crochet hook
tapestry needle and scissors
Polyester Stuffing
Color A: Red Heart in medium brown (<1 skein)
Color B: Red Heart in Ivory (<1 skein)
Color C: Red Heart in Dark Brown (<1 skein)
Color D: Red Heart in Blue or whatever color you’d like (<1 skein)
A little black yarn for eyes
Floral wire for glasses (optional)
Basic Sloth Pattern:
Body + Legs
First Make 2 legs, then we will join and work body.
Legs (make 2):
R1: Using color A, 6sc in MR.
R2-4: sc around
Fasten off leaving small length of yarn on first leg. Work second leg and do not fasten off
Body:
R5: continuing from second leg, sc in stitch next to the tail of yarn you left in the first leg worked. Place stitch marker. Sc in next 5 sts, sc in st in next leg to join, sc in next 5 sts.
There will be a small gap in between legs - we’ll use the tail of yarn from first leg worked to close that hole.

R6-7: sc around
Join color D and continue working
R8-9: sc around
R10: *sc4, sc2tog* repeat one more time
R11-12: sc around
Fasten off
Head:
R1: Using color A, 6sc in MR
R2: 2sc in each st around
R3: *sc, 2sc* around
R4-7: sc around
R8: *sc2tog, sc* around
R9:*sc2tog, sc in next 2 sts* repeat 2 more times around
Fasten off leaving tail for sewing
Arms (Make 2)
R1: Using color A, 6sc in MR
R2-3: sc around
Fasten off leaving tail for sewing
Face:
R1: Using color B, ch 5. Sc in second ch from hook and in next 2 sts, 2sc in last ch. Begin working on other side of chains and sc in next 3 sts.
R2: *2sc, sc in next 3 sts* repeat one more time
R3: *2sc in next 2 sts, sc in next 3 sts* repeat one more time
Fasten off, leaving tail for sewing
Eye Patches (Make 2):
R1: Using color C, ch 4. Sc in second ch from hook and in next st. 2 sc in last ch. Begin working on other side of chains and sc in next 2 sts.
Fasten off, leaving tail for sewing
Assembly:
Sew face onto head, sewing using the blo of the face.
Sew eye patches onto face, using blo of the eye patches
Embroider little nose with dark brown yarn, and eyes with black.
Sew the gap in between the legs closed.
Stuff all pieces and sew together
And now you have your little sloth! Attach a keychain ring or leave it as is. Make your own little professional sloth, or keep reading to make a student sloth :)
Glasses:
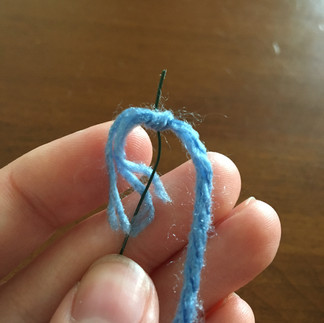
Loosely shape the floral wire into the shape of glasses you want on your sloth, then cut the floral wire a tad bit longer than that. Tie yarn as close to the end of the wire as possible. Fold end over yarn and wrap tightly as close to the other end of the wire as
possible. When you get to the end, fold the end over and wrap over end and
knot. Put glasses on face and attach to head, tucking the ends of yarn into the head.
Book Bag:
Chain 4 and hdc in second st from hook and each st across. Working on other side of the chain, hdc across. Hdc around for as tall as you’d like your book bag to be. Then slst around top and ch to the length you’d like to be. Slst on opposite side of bag to make strap. There’s your book bag! I made my book bag removable - you just slide it over the body.
The Student Sloth Keychain is all done! I hope you enjoyed crocheting it and found the pattern helpful. I would love to see your finished amigurumi, so share a picture on social media with me by tagging me @the_cozyx. If you need any help feel free to comment, DM on Instagram, or email me at thecozyxofficial@gmail.com - Happy crocheting!


Comments